USB Memory Stick ကို Format ခ်မရရင္
တစ္ခါတစ္ေလ ကိုယ္သံုးေနတဲ႔ USB,Memory Card ေလးေတြက အေၾကာင္းအမ်ိဳးမ်ိဳးေၾကာင္႔ ဖိုင္လ္ေတြ ထပ္ထည္႔လို႔ မရေတာ႔တာမ်ိဳး၊ ထုတ္လို႔ မရေတာ႔တာမ်ိဳး၊ Format ခ်မရတာမ်ိဳး ျဖစ္တတ္ပါတယ္။ အဲဒီလို ျပႆနာမ်ိဳး ၾကံဳလာခဲ့ရင္ ဒီနည္းလမ္းအတိုင္း ေျဖရွင္းေပးႏိုင္ပါတယ္...။
USB Memory Stick ကို ကြန္ျပဴတာမွာ တပ္ထားပါ...။
Start > Search box ထဲမွာ devmgmt.msc ေရးျပီး Enter ေခါက္ပါ...
Disk Drives ဆိုတာေလးကို ကလစ္လိုက္ပါ အဲဒီမွာ ကိုယ္႔ရဲ႕ USB Drive ကို ေတြ႔ပါလိမ္႔မယ္။
USB Device ကို Double Click (or) Right Click ေထာက္ Propereties ကိုႏွိပ္ပါ။ ေနာက္ထပ္ Box ေလးပြင့္လာရင္ အေပၚက MenuTab မွာ
Policies ကိုႏွိပ္ျပီး "Optimize for performance" ကို ေရြးေပးလိုက္ပါ။ Window 7 မွာေတာ့ (“Better
performance”) လို႔ေပၚပါတယ္..။
အားလံုးျပီးရင္ My Computer ကို ျပန္သြားျပီး USB Drive ေပၚကို Right click > Format ခ်ၾကည္႔ပါ။ Format ခ်တဲ႔ ေနရာမွာ File System ကိုၾကည္႔လိုက္ရင္ NTFS Format Option ကို ေတြ႔ရပါလိမ္႔မယ္။
USB drive ကို NTFS နဲ႔ Format ခ်လို႔ရပါျပီ...။Format ခ်မရတဲ့ Memory Stick ျပဳျပင္နည္း
သေဘာတရားကေတာ့ Format ခ်ခိုင္းတယ္ဆိုတာက တနည္းအားျဖင့္ File System
မရွိလို႔ပါပဲ။ Format ခ်လည္း မရတာကေတာ့ Partition Table က Corrupt
ျဖစ္လို႔ပါ။ အဲဒါေၾကာင့္ Partition Table ဖ်က္ၿပီး အသစ္ျပန္ေဆာက္၊ ၿပီးေတာ့
File System ျပန္သတ္မွတ္လိုက္ရင္ ျပန္ေကာင္းသြားပါလိမ့္မယ္။ လိုအပ္တဲ့
Software ကေတာ့ ႏွစ္ခုတည္းပါ။Test Disk ရယ္ Bootice ရယ္ပါ။ ပထမဆံုး Test
Disk ကို Run ပါ။ ေအာက္မွာျပထားသလို ေပၚလာပါလိမ့္မယ္။
No Log ကို Keyboard က Arrow Key နဲ႔ ေရြးၿပီး Enter ေခါက္ပါ။ အဲဒီအခါမွာ
Hard Disk နဲ႔ Memory Stick ရယ္ ေပၚလာပါလိမ့္မယ္။ Memory Stick ကို ေရြးပါ။
Enter ေခါက္ပါ။ ေနာက္ထပ္ သူက Partition Table type ကို
ေရြးခိုင္းပါလိမ့္မယ္။ Intel ကို ေရြးၿပီး Enter ေခါက္ပါ။ အဲဒီအခါမွာ
[Analyze] [Advanced] [Geometry] စသည္ျဖင့္ ေရြးခ်ယ္စရာေတြ
ေပၚလာပါလိမ့္မယ္။ အဲဒီထဲက [Delete] ကို ေရြးၿပီး Enter ေခါက္ပါ။ Yes/No
ေမးရင္ Y ကို ႏွိပ္ၿပီး Enter ေခါက္ပါ။ ဒါဆိုရင္ Memory Stick ရဲ႕
Partition Table ကို ဖ်က္ၿပီး သြားပါၿပီ။
ဒီထိဆိုရင္ TestDisk ရဲ႕အပိုင္း ၿပီးသြားပါၿပီ။ ေနာက္ထပ္ Bootice ကို Run ပါ။ ေအာက္မွာ ျပထားသလို ေပၚလာပါလိမ့္မယ္။
Perform Format ကို ႏွိပ္ပါ။ ေနာက္တစ္ဆင့္ ေပၚလာရင္ USB-HDD mode (Single
Partition) ကို ေရြးပါ။ Next ကို ႏွိပ္ပါ။ Dialog box ေပၚလာရင္ OK ႏွိပ္ပါ။
ဒါဆိုရင္ Format စရိုက္ပါလိမ့္မယ္။ ရပါၿပီ စာဖတ္သူရဲ႕ Stick အပ်က္ကေလး
ျပန္ေကာင္းသြားပါလိမ့္မယ္။
Download Bootice (100KB)
Download TestDisk (1.44MB)
http://db.tt/Nwmbws6
Kingston Format Utility v1.0.3.0 (USB Drives ေတြ Format ခ်မရရင္)
USB Drives ေတြ Format ခ်မရရင္ စမ္းၾကည့္ႏိုင္ဖို႔ တင္ေပးလိုက္ပါတယ္....:)
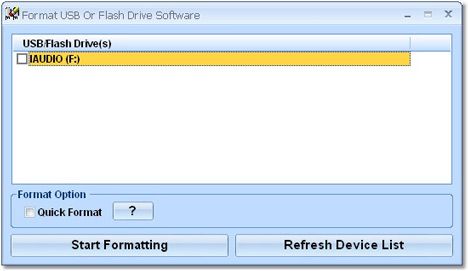
Format USB Or Flash Drive Software v7.0

USB , Memory Card. Flash Drive ေတြ Format ခ်မရျဖစ္ေနရင္ ဒါေလးသံုးၾကည့္ပါ...။
Format USB Or Flash Drive Software is a handy and reliable application designed to format
removable drives.
USB flash Drive ကုိ NTFS system နဲ႔ Format ခ်မယ္
NTFS system ဟာ FAT နဲ႔ FAT32 system ေတြနဲ႔ယွဥ္ရင္ အားသာခ်က္ေတြရွိအေျမာက္အမ်ားရွိေနတာေၾကာင့္ FAT32 system ကုိသာမ်ားေသာအားျဖင့္ အသံုးျပဳထားတဲ့ USB flash drive ေတြကို NTFS system နဲ႔အသံုးျပဳလို႔ရေအာင္ ဖန္တီးျပမွာျဖစ္ပါတယ္ NTFS system ကုိအသံုးျပဳျခင္းအားျဖင့္ သင့္ stick ဟာ memory ပိုမိုဆံ့လာတာကိုေတြ႔ရပါလိမ့္မယ္ ကဲစလိုက္ရေအာင္ အရင္ဆံုး NTFS system အျဖစ္သံုးခ်င္တဲ့ USB Flash Drive ကုိ ကြန္ျပဴတာမွာတပ္ထားလိုက္ပါ ျပီးရင္ My Computer မွာ RC(right click) ႏွိပ္ျပီး properties ကုိသြားပါ ။ ဒီအဆင့္ျပီးရင္ Hardware ကုိဆက္သြားျပီ Device manager ကိုအဆင့္အတိုင္းဆက္သြားပါ Device Manager ကိုေရာက္ျပီဆုိရင္ သင့္ရဲ႕ Flash Drive name ကုိလိုက္ရွာပါ ျပီးရင္ drive name ေပၚမွာ double click ႏွိပ္ပါ properties ေပၚလာပါမယ္ Properties မွာတစ္ဆင့္ policies ကိုဆက္သြားျပီး Optimize for Performance ကုိ check ေပးျပီး OK ေပးပါ ဒါဆိုရင္ျပီးပါျပီ ျပီးရင္ My Computer ကုိ၀င္ျပီး Stick ကုိ Format ခ်ပါမယ္ Stick volume name ေပၚမွာ RC ႏွိပ္ျပီး Format ကုိ click ႏိွပ္ပါ NTFS ဆိုတာေတြ႔ပါမယ္..။အဲ့ဒါကိုေရြးျပီး Format ခ်လိုက္ယံုနဲ႔ သင့္ stick ဟာ NTFS system ျဖစ္သြားပါျပီ..။အဆင္မေျပေသးရင္ေအာက္မွာ Video File ရွိပါတယ္ ၾကည့္ၾကည့္ပါ..။
Format ခ်လည္း မရတာက Partition Table က Corrupt ျဖစ္လို႔ပါ။ အဲဒါေၾကာင့္ Partition Table ဖ်က္ၿပီး အသစ္ျပန္ေဆာက္၊ ၿပီးေတာ့ File System ျပန္သတ္မွတ္လိုက္ရင္ ျပန္ေကာင္းသြားပါလိမ့္မယ္။ လိုအပ္တဲ့ Software ကေတာ့ ႏွစ္ခုတည္းပါ။Test Disk ရယ္ Bootice ရယ္ပါ။
ေအာက္ကလင့္မွာ ေဒါင္းလိုက္ပါ..
Download Bootice (100KB)
Download TestDisk (1.44MB)
ပထမဆံုး Test Disk ကို Run ပါ။
No Log ကို Keyboard က Arrow Key နဲ႔ ေရြးၿပီး Enter ေခါက္ပါ။ အဲဒီအခါမွာ Hard Disk နဲ႔ Memory Stick ရယ္ ေပၚလာပါလိမ့္မယ္။ Memory Stick ကို ေရြးပါ။ Enter ေခါက္ပါ။ ေနာက္ထပ္ သူက Partition Table type ကို ေရြးခိုင္းပါလိမ့္မယ္။ Intel ကို ေရြးၿပီး Enter ေခါက္ပါ။ အဲဒီအခါမွာ [Analyze] [Advanced] [Geometry] စသည္ျဖင့္ ေရြးခ်ယ္စရာေတြ ေပၚလာပါလိမ့္မယ္။ အဲဒီထဲက [Delete] ကို ေရြးၿပီး Enter ေခါက္ပါ။ Yes/No ေမးရင္ Y ကို ႏွိပ္ၿပီး Enter ေခါက္ပါ။ ဒါဆိုရင္ Memory Stick ရဲ႕ Partition Table ကို ဖ်က္ၿပီး သြားပါၿပီ။
ဒီထိဆိုရင္ TestDisk ရဲ႕အပိုင္း ၿပီးသြားပါၿပီ။ ေနာက္ထပ္ Bootice ကို Run ပါ။ Perform Format ကို ႏွိပ္ပါ။ ေနာက္တစ္ဆင့္ ေပၚလာရင္ USB-HDD mode (Single Partition) ကို ေရြးပါ။ Next ကို ႏွိပ္ပါ။ Dialog box ေပၚလာရင္ OK ႏွိပ္ပါ။ ဒါဆိုရင္ Format စရိုက္ပါလိမ့္မယ္။ ရပါၿပီ စာဖတ္သူရဲ႕ Stick အပ်က္ကေလး ျပန္ေကာင္းသြားပါလိမ့္မယ္။
အဆင္ေျပပါေစ..


အဆင္မေျပဘူးအခ်စ္ေရ
ReplyDeleteအဆင္မေျပဘူးအကုိေရ ေနာက္နည္းေပးပါလား
ReplyDelete